11 April 2010

Radcom Art Show

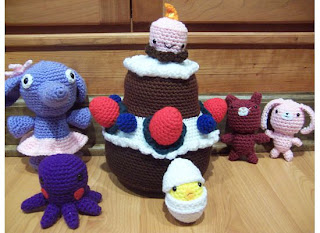
I have a really good excuse this time for not posting in ages. I have been preparing for my first ever art show. It is through my employer who is doing it as a fund raiser for the Leukemia and Lymphoma Society. All money that I make that day will be donated to the cause. I have a few more pieces to finish and frame. Here is some of what I will be selling:
Join me at the show, if you can. There are several other artists with everything from photography, to blown glass, to jewelry. Here are the details.

Saturday, April 17th, 2010
10:00 am - 2:00 pm
Radcom
561 Boston Mills Rd. Suite 400
Hudson, OH 44236
330-650-4777

View Larger Map

You can also get more information or sign up as an artist at: http://www.radcomservices.com/art-show. Hope to see you there!

06 February 2010

Teddy Bears with Heart by Deborah Chaddock Brown


Today's guest post is from Deborah Chaddock Brown. She has an incredible blog, Make or Break Moments. She is a freelance writer, speaker, and trainer. She provides her audience with real life solutions and examples that help to market their business, establish their expert status, and enhance the customer relationship.

She also has a passion for crafting, and she has been gracious enough to share information on her most recent project. Thanks Deborah!

Two-Hour Teddy Bears (Two-Hour Crafts)

Teddy Bears With Heart 
By Deborah Chaddock Brown

I’ve found a way to keep the memory of my Dad as a visible presence in my life. A couple of years ago he tried the South Beach diet and went from an XL to a L and sent my son some of his too large, colorful sport shirts. Occasionally, my son will wear one of them and it brings a smile to my face. We lost my Dad unexpected almost one year ago and seeing that little reminder of my Dad is a great comfort.

As we approach the one year anniversary of his passing I wondered what I might do for the family that would be meaningful and yet fun. I saw the shirts in my son’s closet and convinced him to donate a couple of them to the cause. Going through my embarrassingly large collection of craft books, I stumbled upon a classic: Two-Hour Teddy Bears by Anita Louise Crane.


This bear is called Bearheart. I made him for my Mom. The body of the bear is made from one of Dad’s Ralph Lauren sport shirts. The heart I constructed from a quilted placemat I found at the Dollar Tree. “Always” was the song my folks fell in love to and was considered their song. I thought it would be a fitting sentiment to cross stitch on the front of the heart. 

I am making a different bear for each member of the family using scraps from his shirts. In some cases the shirts will be used for a vest in others for the wings on an angel bear. In every case, the bears will be constructed with love and a gentle reminder of someone dear to our hearts.

If you have lost someone close to you, consider using one of their garments to accent a craft piece so that you have a loving reminder of how special they have been in your life. 

17 January 2010

Tips for Paper-Piecing Quilt Blocks

I finished my Fall Swap wall hanging and will have it in the mail by the deadline. YEAH! I wanted to use a pattern that allowed me to incorporated all the great fall colors. I selected a paper-piecing pattern from Bright and Bold Paperpieced Blocks by Carol Doak because her patterns use - obviously - bright and bold colors. Perfect. The patterns also have a kaleidoscope look, which appealed to me.

I have never had luck with paper-piecing because the instructions I had were not very clear. I wasted a lot of fabric guessing what size to cut my pieces, and I had various other issues trying to line up the fabric, removing the paper without pulling stitches, and a lining up finished blocks. Carol's instructions looked clear and detailed, so I gave it a try.


Overall, Doak's instructions worked for me and I really like the results. The greatest feature in the book is the cutting instructions and measurements for each piece. I did not have to guess what size to cut the pieces.

As I completed my wall-hanging, I created a list of tips for paper-piecing that will make your experience easier.


    1. I am all about saving money so I used ordinary printer paper to print the block patterns. It worked, but with unnecessary difficulties. I highly recommend that you spend the few extra dollars and purchase the foundation paper. Foundation paper clearly shows the pattern through either side, it allows you to see the fabric through the pattern, and it tears easily when it is time to remove the pattern from the fabric.  


    2. Though it takes longer, take the time to fold the paper-pattern back on the line between the two pieces you are about to sew together. Align your ruler so that it extends 1/4" over the paper and trim the fabric. This will help you properly align your fabric pieces accurately.


    3. Even if the instructions say to stitch 1/4" on either side of the pattern lines, don't. When it is time to fold the paper back and trim the fabric to 1/4", you will have to rip the paper where your stitch goes past the line.

    4. Do not just finger press the fabric pieces open. Take the time to iron them. This helps to reduce the bulk where several pieces come together.

    5. Check out these other tips from Quilter's Around the World.
      Paper-piecing takes longer, but the results are fantastic. I have not had points so sharp or pieces align so accurately.

      If you have any tips for paper-piecing, please share them in the comments section.

      14 January 2010

      Squiggle Crochet


      Squiggle crochet
      Originally uploaded by sarah london textiles

      Have you heard of Squiggle Crochet? I hadn't either until I read my morning blogs.

      Sarah London featured this beautiful square she crocheted on her blog and Flickr. I have not been able to find instructions, but she does promise to have the pattern available in a Hip to Hook 2010 pattern.

      You can check out her blog at http://sarahlondon.wordpress.com/2010/01/14/squiggle-crochet/.

      09 January 2010

      Cute Patterns in Amigurumi Too! by Ana Paula Rimoli


      I am still enthralled with amigurumi. For my niece’s third birthday, I crocheted more of the little critters in Ana Paula Rimoli’s book Amigurumi World and the birthday cake. I loved making up these patterns so much, that I purchased Rimoli’s second book Amigurumi Too!


      I crocheted this tea set from the second book over the holidays. I love how it turned out. The little spoons and chocolate chips really make the set.

      After today, however, I am getting back to my quilting. I joined the Fall Quilt Swap on Quiltinggallery.com. I decided to give paper piecing another try. My first attempt turned out okay, but it took me longer and I wasted a lot of material. I purchased Carol Doak’s Bright and Bold Paperpiecing book. The instructions look clear and easy to follow. I will let you know how it turns out. Hopefully by next week!

      In the mean time, have fun with your crafting endeavors, and I would love to hear from you.